After I was interviewed on the Food Blogger Pro podcast, and published this article, I got dozens of questions asking how I went about optimizing a post. After all, it is one of the most important contributions to my organic traffic more than doubling in 2018 vs 2017.
I’m thrilled that so many of you are interested in using this technique to grow your rankings and your organic traffic, and I’m going to provide you a step-by-step guide that you can follow to optimize your posts.

Why optimize old posts?
If you’re looking for the most impactful results in the least amount of time, optimization is your friend.
An existing post, with at least 6 months of history (meaning it has been live for 6 months or longer), is already on Google’s radar. Since you should be optimizing a post for a keyword(s) that it is already ranking for, what you’re really doing is giving Google even more information about your expertise in the topic which, if done right, prompts Google to move your article up in the rankings.
If you were to write a new article about the keyword, it can take 4-6 months for it to reach its peak rank (depending on your website’s overall authority in the eyes of Google). Optimizations, in my experience, can climb in the rankings in a matter of weeks. Why? Think of it like this: who are you more likely to trust: someone you’ve known for 6 months or more? Or a friend of a friend who you just met? Ok, maybe that’s not a perfect metaphor, but you get the idea.
If nothing else, optimizing posts is beneficial because it takes a fraction of the time that you’d need to invest to create a new post. So you can have a post ranking more quickly, for less work.
If the name of the game is getting great content out to the world and bringing people to your website on a regular basis, why not make your existing articles work harder for you?
An optimization case study
I’m going to walk you through the process of identifying the best targets for optimization on your site, using my friend Jen’s site aperitiffriday.com.
Like many of us, Jen has been blogging for quite some time and has amassed an archive of over 200 recipe posts. Also, like many of us, Jen didn’t know what SEO was – let alone that she was supposed to be writing for the mysterious Google Bots.
But now that she’s getting more serious about monetizing her blog and has set some traffic and revenue goals, she realized it’s time to get serious about SEO.
Sound familiar?
If you’re in the same boat, this process will be invaluable to you in the process of proactively grow your blog’s organic traffic.
What you’ll need to get started
All you need to optimize posts is a website with at least 6 months (but preferably a year or more) of content, an account with SEM Rush or Ahrefs (a free account is fine), and internet access (to use Google.com).
Ideally, you’ll also have a Google Analytics account and/or a Google Search Console account.
Plus, of course some time: first to do the research to figure out what post to optimize, and for what keyword, and then to write the optimized copy (which we’re not going to talk about in this post).
Step 1: Identify posts to optimize
There are two ways to identify the best posts to optimize. The first is my analyzing your organic traffic, and the second is by using an SEO tool to analyze your website’s ranking.
Method #1: Analyze your organic traffic using Google Analytics
The best resource for this is Google Analytics. Nothing beats going straight to the source when you want to understand how you’re doing in search, and where your best opportunities lie for improvement.
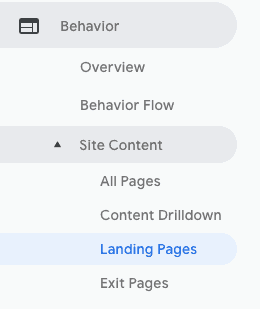
In order to get started, open your GA account and, in the lefthand sidebar, navigate to Behavior > Site Content > Landing Pages. This will generate a list of all the pages that people enter your site through.
Now you need to filter out anything that isn’t organic traffic, so that you are looking only at the pages that people landed on when they came from a search engine (in 99% of cases, that search engine will be Google, so no need to worry about filtering for particular search engine).
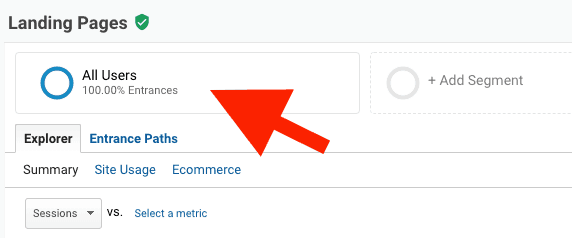
To filter for organic traffic only, scroll to the box near the top of the page that says “All Users”.
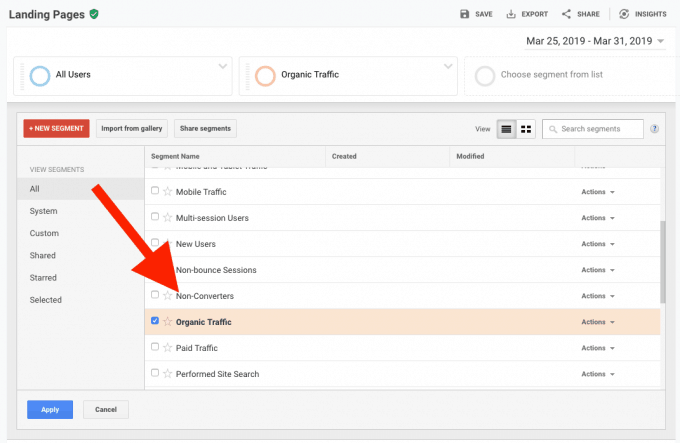
Click on it to reveal a dropdown box. The topmost option “all users” will be checked. Uncheck this, then scroll down until you see the Organic Users list option, and check that box.
Click the blue “apply” button.
Next you need to adjust your date range. Click the existing date range in the upper right hand corner and you’ll open the calendar view. Just change the start date to between six months and one year ago. Go with six months if you have more than 20,000 traffic sessions per month, and go with a year’s worth of data if you have less.
Now you’ll see a list, below the line graph, of the top 10 posts on your site that have generated the most organic traffic on your website.
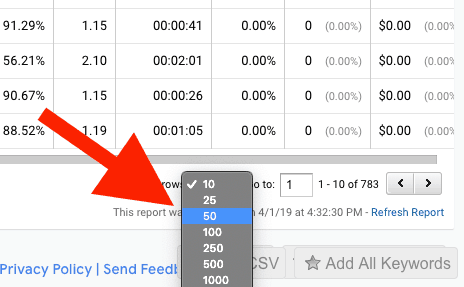
Below the chart of posts, you’ll see, in tiny lettering, “show rows:” and a dropdown box that says 10. Change that option to 50.
Now, export your results and move on to step 2 (skip the next section).
Method #2: Analyze your site’s rankings using an SEO tool
For this method, you’ll need access to a good quality SEO tool. I recommend Ahrefs or SEM Rush (Ahrefs is the one I use, but both work fine).
They are very pricy, but remember that it is an investment in growing your site and your income. If necessary, you can share your subscription with someone else, or you could pay for one month only, and make the most of that month by doing as much analysis and research as you’ll need for the next six months to a year.
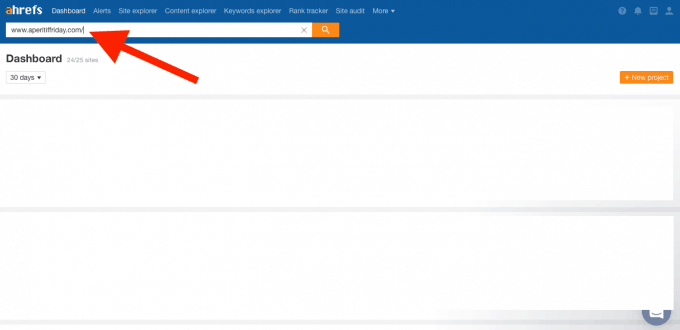
Open your preferred SEO software and enter your site’s URL in the search bar at the top of the screen.
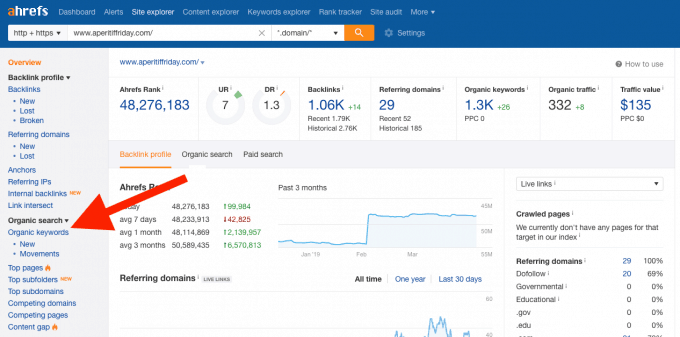
Click the search button. The software will calculate some general stats about your website, and bring you to a dashboard-type page for your site. There is lots of really information that you’ll want to dig into later, but for now, all we’re concerned about is rankings. Under Organic Search in the right hand toolbar, click “organic keywords”.
Note: if you’re using SEM Rush, you want to search your URL, then go to Domain Analytics > organic research in the right hand toolbar. Scroll down until you see a chart titled “Top Organic Keywords” and click the blue button below it that says “view all [number] organic keywords”.
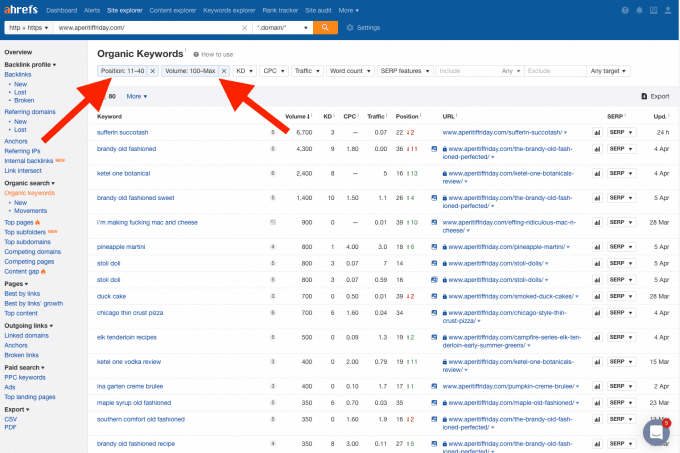
The software will pull up a complete list of every keyword that your website is ranking for. It’s probably going to be a long list! In order to narrow it down to the keywords you’re concerned about, use the filtering options.
First, by position. You’ll probably want to view only the posts that are ranking on pages 2, 3, 4, and maybe 5, since the closer you are to the first page, the less work it will take to bump up your ranking. Remember that page 1 rankings are 1-10, page 2 is 11-20, and so on. For Aperitif Friday, I filtered for anything on the second through fourth page.
Then, I filtered the keywords for volume of 100 or more monthly searches. Your minimum search volume will depend entirely on your site. Jen’s is a site that has relatively weak rankings and domain authority, so we need to start with smaller keywords that are easier to rank on. Once she ranks for those, that builds the foundation of authority with Google that will allow her to start targeting, and ranking for, larger keywords. So gauge your volume level to your site’s current ranking abilities.
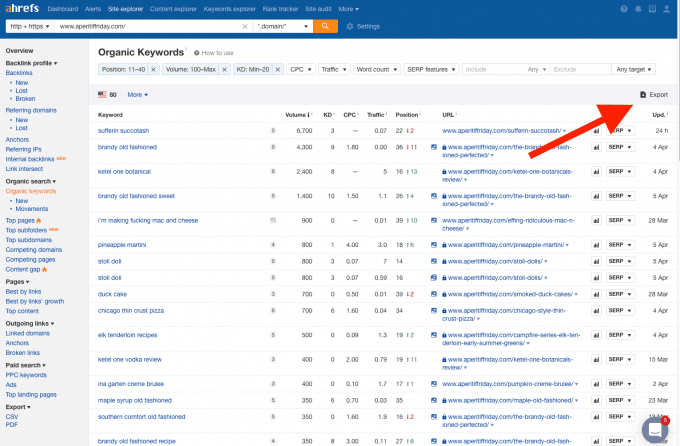
Speaking of ranking ability (i.e. domain authority), you’re going to want to filter out the higher-difficulty keywords, using the “KD” (Keyword Difficulty) feature. Difficulty scores in Ahrefs are calculated out of 100, if that’s helpful. Anything over 40-50 is not something you should go after. I didn’t do this filtering step for Jen, because all of the keywords she’s already ranking for are easy enough, so I didn’t have anything to filter out.
In general, you’ll want to stay under a difficulty score of 20, unless your site already has a lot of authority. (Note that the difficulty ratings are calculated differently in SEM Rush).
Once you apply all the appropriate filters, export your list.
Step 2: Identify Keywords to Optimize For
Open up the list that you exported, either from Google Analytics or Ahrefs (or SEM Rush). I like to use Google Docs to track my keyword/optimization spreadsheets.
You’ll need the following information:
- Keyword
- Post URL
- Position
- Keyword Volume
You won’t have those last two if you’re exporting from Google Analytics. That’s fine.
Delete or hide all the rest of the information on your spreadsheet.
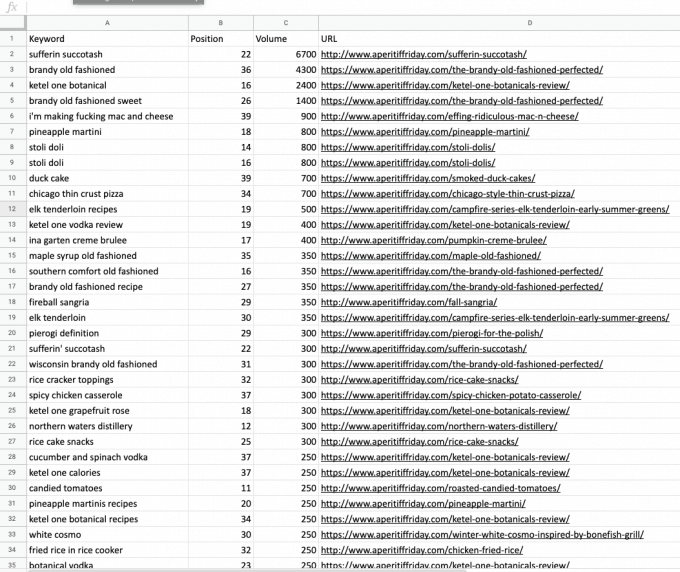
Your spreadsheet should look like this so far:
Take a quick look through the list, and delete any keywords that aren’t a good fit for your site. They might be a brand name, a colloquialism, or just plain nonsense. Don’t worry about repeat keywords yet. In this case, I’m deleting “i’m making fucking mac and cheese” (sorry I said the F word. It was in the keyword!) because that’s a meme. No one is actually searching for a mac and cheese recipe when they search that phrase.
Now you’re going to sort your spreadsheet by URL. Once it’s sorted by URL, go down the list and delete all duplicate mentions of a URL, saving only the mention of the URL that is associated with the highest-volume keyword for that URL. So, if you have a URL that is ranking for 3 keywords, one with volume of 500, one with volume of 350, and one with volume of 200, delete the lines with the 350 and 200 keyword. We want to end up with a list of each URL and the highest-volume keyword associated with it. If you exported from Google Analytics, you don’t need to do this, since your list only includes one instance of each URL.
Note that Jen has a mix of http and https posts, so there were some duplicates. As I went through the list, I had to make sure I was only retaining one version of the same URL for each page.
Once you’ve eliminated all but the highest-keyword entry for each URL, sort the list by Volume (Z –> A).
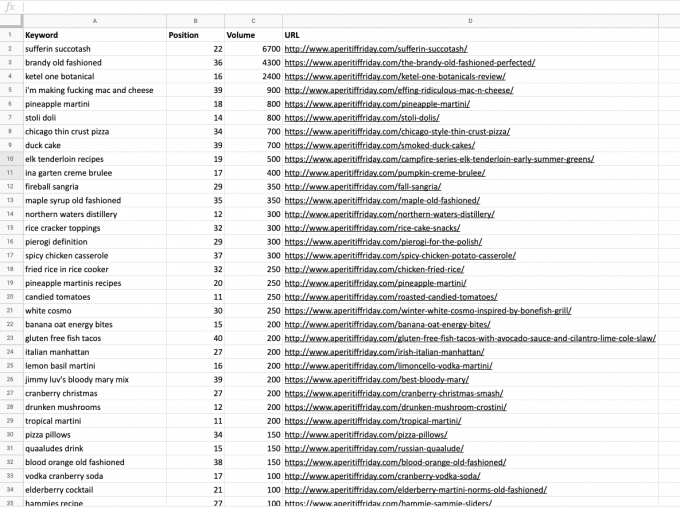
Now your list should look like this:
Now you have a list of the highest-opportunity posts on your site to optimize.
To identify the keyword(s) to optimize each post for, we’re going to go back to Ahrefs (or SEM Rush).
Select and copy the first URL on your list. For Jen, that’s http://www.aperitiffriday.com/sufferin-succotash/ – but I’m going to skip that one because I can see that the opportunity for this keyword is “sufferin succotash”, which is a Warner Brothers character’s catchphrase – not a recipe query. I missed it earlier, but I’m going to remove it now (after checking to make sure it wasn’t ranking for any other high potential keywords, and it’s not).
So the next one on the list is: https://www.aperitiffriday.com/the-brandy-old-fashioned-perfected/.
Back to Ahrefs we go!
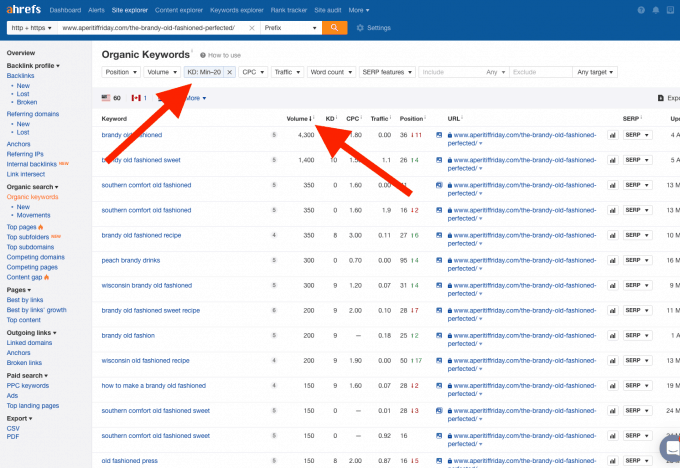
You’re going to use the same method that you used to identify the top keywords for your URL, only now you’re going to ask the software just for the keywords for the specific page, rather than your whole site. Paste the first URL on your list into the search bar, then navigate to the list of organic keywords.
Filter the list by volume (just click on the column header that says “volume”), the filter out all of the keywords with a difficulty level over about 20 (or whatever is right for your site).
Now, take a look at the list. The first two keywords are very promising. “Brandy old fashioned” has a volume of 4300 (!!) and a difficulty of only 9/100, so it could be a great opportunity. “Brandy old fashioned sweet” also has decent volume and low difficulty. If I had to pick one, I’d go for the slightly lower volume keyword, since she’s already ranking an entire page higher for that one, meaning that it will be easier for you to get to the first page.
The final step is to go back to your spreadsheet, clear out the keyword column (if you exported from Ahrefs or SEM Rush) or add one (if you exported from Google Analytics) and add the keyword you chose for the post.
How to optimize a post
Now that you’ve identified a post to optimize, and a keyword to optimize for, it’s time to start (re)writing!
It turns out that optimizing a post isn’t hard at all, and there are 4 simple steps that you need to follow for SEO success. I cover all of this in Part 2 of this series, which you can read here.



Cathy says
Thank you so much for these great, detailed instructions! I definitely plan to sit down and go through this process step by step.
Nora (A Clean Bake) says
You’re welcome, Cathy! So glad it is helpful!
Christin says
WOW this was incredibly helpful (and the part 2 post as well). I just signed up with SEM Rush and loved seeing your process for targeting high traffic keywords. I’m definitely going to be following this method, starting today. Thank you for this! I’m bookmarking this page now! =)
Nora (A Clean Bake) says
I’m so glad!! Good luck!