Want to learn all the tips and tricks for how to bake flatter cake layers? This is the post for you! You won’t believe how easy it is!
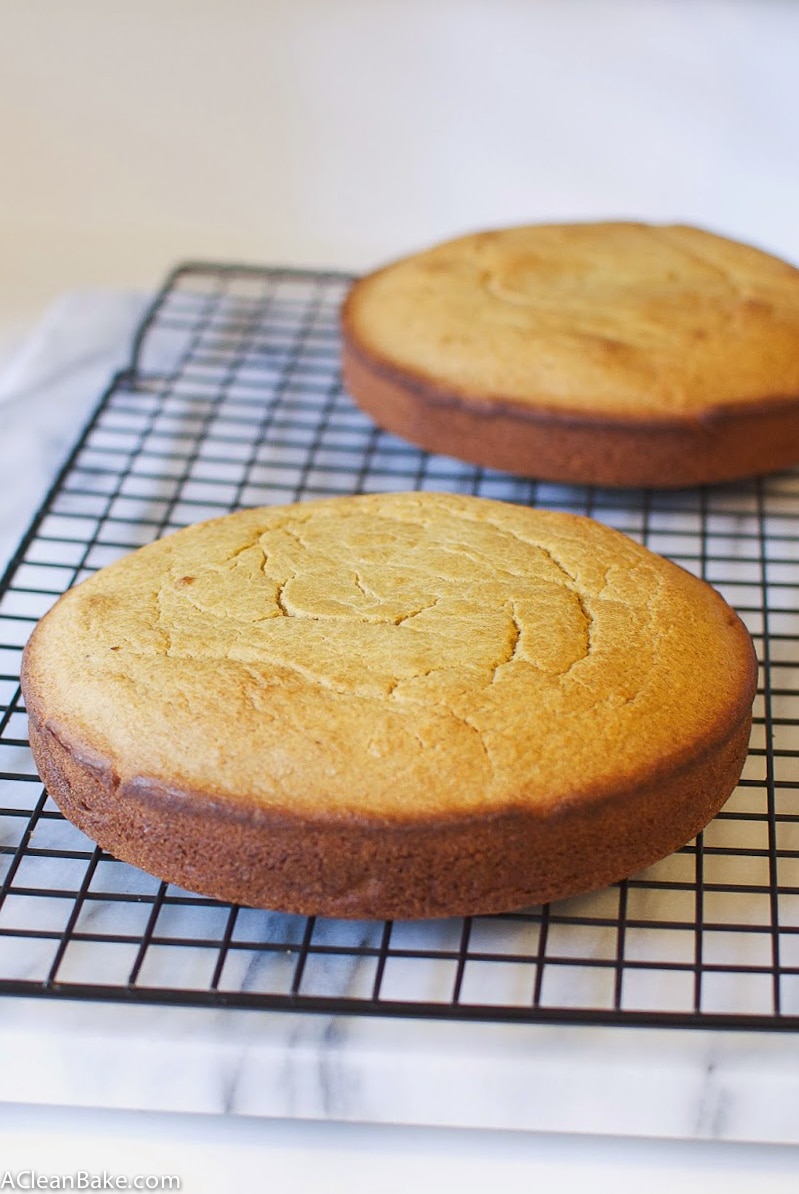
When you’re making a layer cake, the most frustrating moment is when you have frosted the first layer and add the second only to turn around and find it… jaunty. It tips to one side, or slides backward or just otherwise makes the cake look amateurish. Luckily, baking un-domed cake layers requires just a few easy steps, which I will lay out for you, or if you just want the summary, you can scroll all the way to the bottom of this post.

Your first option for getting flat layers is, of course, to use a bread knife to carefully slice off the domed tops and risk an out-of-the-frying-pan-into-the-fire situation in which you rid yourself of a domed cake in favor of a cake ramp, discarding a significant portion of cake in the process (and we all know that wasting cake is a cardinal sin, right?).
Your second option, however, is to take steps to make sure that your cakes bake up with less of a dome shape to begin with. Sometimes domed pastries are desirable, like in tall fluffy muffins or quickbreads. You achieve that by quickly heating up the batter so that the air bubbles (from leavener) within it expand as much as possible. Since the outermost batter is closer to the heat source, it will set first, while the center, which is insulated by the outer batter, continues to rise. That is why many cupcake and muffin recipes suggest cranking the heat for the first 5 minutes or so of baking (which triggers as much rising as possible before the outer ring of batter sets) before turning it down to normal baking temperature (allowing the rest of the batter to cook through evenly without burning the tops).

In order to achieve the opposite effect, you need to do the opposite. First, bake the cake at a steady low(er) temperature, rather than starting at a very high temp and adjusting back down to normal-low temp. Second, have enough, but not too much, air (leavener) in the cake. You need some, because the cake needs to rise enough to be… well, a cake, as opposed to a brick. But you want to have just enough so that it is fully activated by the time the outer batter has set, so that the center doesn’t continue to rise too much. You can also take steps to mitigate the amount of heat that reaches the outermost batter in the pan, by insulating the sides of the pan. This helps the entire cake to bake and set at a more even rate, so that the sides are less likely to be set while the center continues rising.

Tips to Bake Flatter Cake Layers:
- Keep an eye on the leavener in the recipe and decrease by a very small amount (I’m talking about 1/8 – 1/4 teaspoon less than the recipe calls for), if you feel like the recipe can handle it. This is sort of like cake Russian Roulette, so I wouldn’t suggest it in a recipe you have never tried before.
- Firmly smack the bottoms of the cake pans on the counter 5-8 times before you put them in the oven. This has the dual benefits of very reliably leveling out the batter, and of forcing out any large air bubbles that might have caused excessive or uneven rising in the oven. Don’t do more than 5-8 taps, though, because if you force ALL of the air out of the batter, it won’t rise at all.
- Insulate the sides of the pan, which prevents heat from reaching the outermost batter quite as quickly, and essentially reduces the discrepancy in baking time between the edges an the core. I do this by folding a sheet of tinfoil, the length of the circumference of the pan, over itself several times to create a loop of about 5 layers of foil that helps insulate the pan. (Although I have been doing this for a long time and it has worked well enough, I recently discovered this tutorial, which calls for a moistened towel as insulation. Has anyone tried this?)
Becky Winkler says
This is some great info! I recently found some double-walled cake pans at a yard sale that are great for baking flatter cakes. Do you have any tips for flattening out brownies or bundt cakes that fall in the center and are much higher on the sides? That has happened to me a couple times lately.
Nora @ A Clean Bake says
Hey Becky! Yep, basically with the tinfoil you’re mimicking a double-walled cake pan. I have the cheap ones 🙂
I have to admit that I haven’t made a bundt cake in years, but I can help you with the brownies (and I imagine the solution is probably very similar for bundts). Basically, baked goods collapse when they rise too quickly but the batter underneath the risen area isn’t able to support it. So, the solution is to either let it rise more slowly or support it more (gluten is, unfortunately, great for this) or let it rise less. In practical terms this means one, or a combination of the following:
1) Lower baking temp, and baking for slightly longer time to compensate, so that the brownies or cake rises more slowly and steadily while it bakes so that it can support its height;
2) Reduce the leavener and make sure not to overmix, since mixing incorporates more air and air is what expands in the oven to make things rise. This is what I’d recommend in particular for brownies if you, like me, like to undercook your brownies 🙂 ; or
3) Add more dry ingredients or eggs, which is often where the structure in a recipe comes from. However, I hate messing with ingredients that are so fundamental to the recipe, so this third tactic is only in case of emergency!
Good luck!
Connie says
To your answer about the towel, I have not tried this but they do sell a pan wrap that you wet and wrap around the pan. They are available thru Wilton if you can find local or they Amazon. I wet mine and then take a towel to soak off some water. Called turn out wonderfully.
Nora (A Clean Bake) says
You can certainly buy a pan wrap although I prefer using what I have on hand!
Merilyn Probst says
I always use the wet paper towel inside the wrapped aluminium and never have any problem with level cakes. Been doing it for years
Nora (A Clean Bake) says
That’s another good strategy. Anything that helps heat distribute evenly will work!
sweetsociety says
I must try the tinfoil trick!! i have used moistened towels and I was surprised and pleased at how flat my cake turned out. Well worth the time. Love these tips though, it can be so frustrating leveling a cake.
Nora @ A Clean Bake says
I hope it works for you! I use tinfoil because I didn’t have a t-shirt or towel that I could destroy, and I hate keeping track of stuff like that. The foil is much easier and you can just get rid of it when you’re done!
Nancy says
Fantastic post, Nora! And so timely, because I bake a lot of layer cakes and I always end up slicing off the dome, resulting in an uneven top and a lot of excess cake, which I end up eating myself. I’m definitely going to try the foil trick. I’ve never wanted to cut up a t-shirt to wrap around the cake pan. I’m getting all excited looking at how perfectly flat your cakes came out!
Nora @ A Clean Bake says
Thanks so much, Nancy! I think the dome-slicing method is a great excuse to taste test the cake, but I for one can never manage a level slice! I think that the more insulation you have, the more evenly the cake will bake, so the t-shirt probably works better, but the foil + being careful about baking temp and air in the batter tricks have always worked for me, and I hope they do for you too!
BabyJune says
Awesome tutorial! I often just shave off the domes of a cake when I want a flatter top, but this sounds like a much better way to do it. Pinning this for later! 🙂
Nora @ A Clean Bake says
Thanks, June! Glad it is helpful!
Graham Blackall says
These layers are so beautiful, Nora. I’ve had my fair share of crazy looking cakes, yet I still don’t do anything to make sure it doesn’t happen again. (Unless you count crossing your fingers as a technical tip.) 🙂 lol
Nora @ A Clean Bake says
I definitely count crossing fingers. It’s a highly scientific method 🙂
Jan Smith says
I have done the towel wrapped around the pan, works like a charm. I dampen it and use a safety pin to attach it together. I just took a an old towel, Ndola cut it in strips. They do make strips specifically for that reason, but an old towel works great and is so much cheaper.
Nora (A Clean Bake) says
Yes! I am a big fan of using what you have.
Susan says
I take off the domes and save them for my grand daughter to make cake pops and cake balls.. Yummy
Nora (A Clean Bake) says
Great idea!
Monica Cheng says
Thanks for the tips, Nora! I personally don’t mind cutting off the domed portion because well, scraps are still delicious to munch on! hehe (: I appreciate your taking the time to explain the theory behind the method.
Nora @ A Clean Bake says
I don’t blame you! I admit this method doesn’t have an equivalent taste-testing step….haha!
jay jay says
I will try the towel method for the first time, wish me luck
Nora (A Clean Bake) says
Good luck, Jay!
Carrie says
Wish I would have read this yesterday. Baked a 3 layer cake last night for my daughter’s 5th birthday party today. First time using this particular recipe and the dome is so tall and the sides are maybe a half inch. I’ve spent days trying to find the right recipe and thinking about how I wanted to decorate it. Not feeling good about it now.
Nora (A Clean Bake) says
Oh noooo!!! I’m so sorry to hear that. What a disappointment!! For a recipe that finicky, you might want to do the soaked-towel trick for extra insulation. Or just a few extra layers of tinfoil. Either way, eek. However, I’m sure if you smother it in rich frosting, no one will complain!!
PS: The cake recipe you had trouble with wasn’t one of mine, was it? if is was, I’d really love to help you figure out what happened and how to fix it! Shoot me an email when you have a moment: acleanbake@gmail.com.
PPS: Happy 5th birthday to your daughter!
Beth Herridge says
So glad that I came upon this today as I’m about to be making my first layer cake and I want it to work.. well don’t we all?! lol.
Thank you very much Nora for writing this down for us all 🙂
God Bless x
Nora (A Clean Bake) says
I’m so glad! I hope that your cakes come out wonderfully!
Brenda Cammarata says
I have handled this issue for years by wrapping the pans with strips of wet rags and pin the in place. Place the pans on a cookie sheet, fill and bake. The outside cooks slower and the cake rises evenly. For novelty pans just wrap the pan with thread to hold the strips in place.
Nora (A Clean Bake) says
Yes, that’s a great tip that I’ve heard other people swear by. I will have to try it sometime!
Grace says
Which of these methods have you found worked out best? The idea of wrapping the baking pan with insulation doesn’t sit too well with me, and was wondering if smacking the bottom of the pans is better.
Nora (A Clean Bake) says
They all work well, but they work differently. I think just smacking the bottom of the pans should be fine.
Page says
I use tin foil wrapped around wet paper towels or newspaper. It works incredibly well.
Fabunmi says
I always use a moistened towel. My cakes come out flat, but they also come out without the crunchy edges.
Nora (A Clean Bake) says
Yes, that works great!
Tanya says
I have been “diapering” my cake pans for 30 years with wet towel strips. Works like a charm.
Nora (A Clean Bake) says
Diapering! I love that!
Jane DiCicco says
I’m wondering what a “lower” temperature would be assuming the recipe calls for 350F.
Nora (A Clean Bake) says
300-325.
Judith says
I saw this trick online.
I cut some strips of (to height of pans) an old kitchen towel and wet them (very wet) with water, THEN wrapped the wet strips in heavy duty foil. The foil keeps the moisture in while baking, but towels are basically dry when finished (I saved for next time!).
I then took the foil wrapped strips and wrapped around the pans. You can fasten with straight pins, safety pins or even heavy duty (like packing tape) as long as the foil stays dry.
Nice flat layers without buying specialty “cake strips”!
Nora (A Clean Bake) says
Yes, that’s similar! Works like a charm!
Elizabeth says
Years ago I read in a book by Cake Boss, the temperature of your batter will affect whether the cake domes or not. Have your ingredients like eggs at room temperature before starting. My Mom always had her eggs out of the fridge a couple of hours before baking.
Nora (A Clean Bake) says
Ah, interesting. I hadn’t heard of that before! Typically, the temperature of ingredients determines how well they incorporate into the batter, which might affect how it holds air, which would then determine how well and evenly it rises! But the bigger temperature determinant is the oven itself, not the batter.
Col Gregory says
I have been using moistened strips of towel for some time now. Fixing them with safety pins. Perfectly flat results every time. My latest purchase of purposely made strips from TEMU work wonders as well. Much easier to use and cost peanuts. ( around $6 for two). Soak them briefly in water before applying to pan. Hope this helps
Nora (A Clean Bake) says
Thanks for the tip!