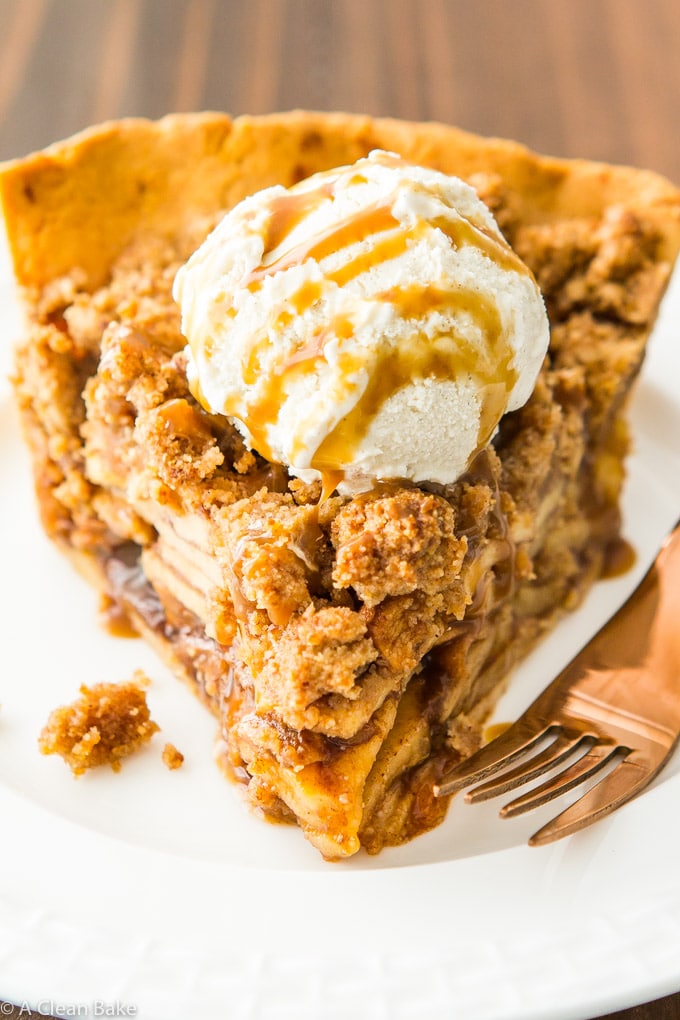
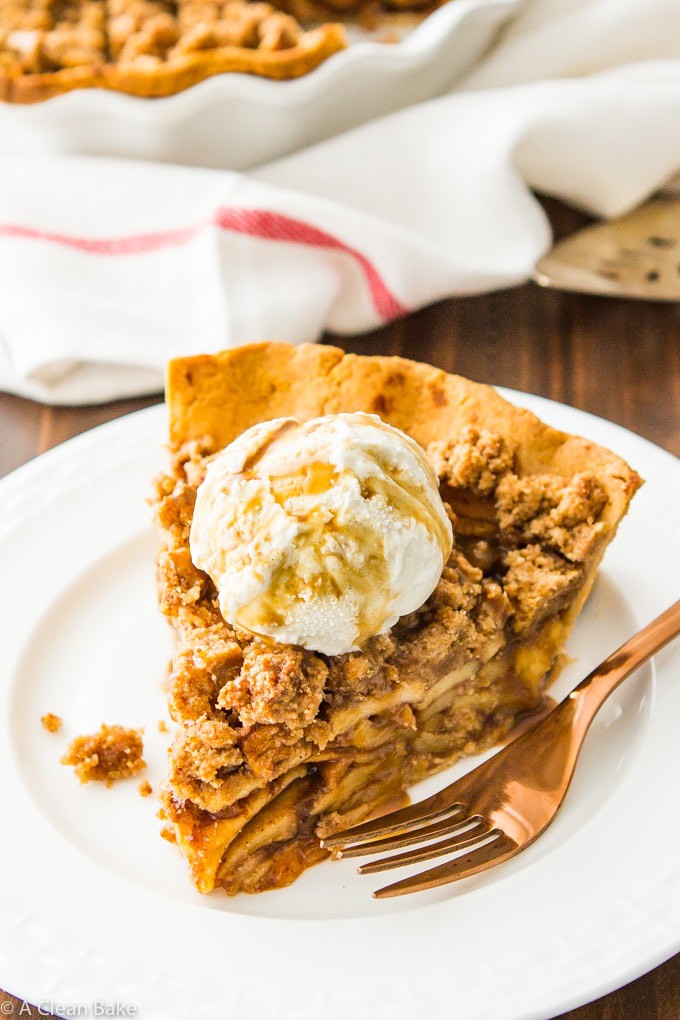
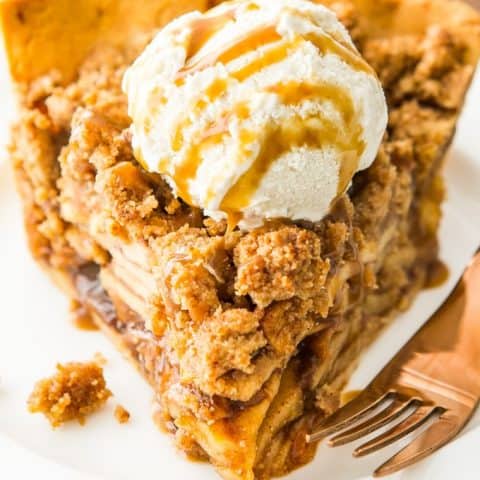
Paleo apple pie is much easier to make than you’d think when you fill a reliable grain free and low carb crust with three kinds of apples, warm cinnamon, and rich coconut sugar, and top it all with a thick layer of luscious crumb topping! Finish it with a dollop of ice cream and a drizzle of caramel sauce. No one will believe this apple pie recipe is gluten free, grain free, and dairy free!
I did promise you apple pie, didn’t I? And I would never break a promise that crucial.
I don’t know why I don’t make pies more often, because they are so satisfying to pull out of the oven. And eat, too, of course. But nothing compares to the feeling of sliding a perfect, golden brown, warm apple pie out of the oven and deeply inhaling the aroma as you place it on the stovetop to cool, and try to avoid the urge to plunge a spoon into the center right away.
Once you’ve waited for it to cool just enough to get to one degree below “sear your tongue so badly you regret it for days”, boy have you earned your slice.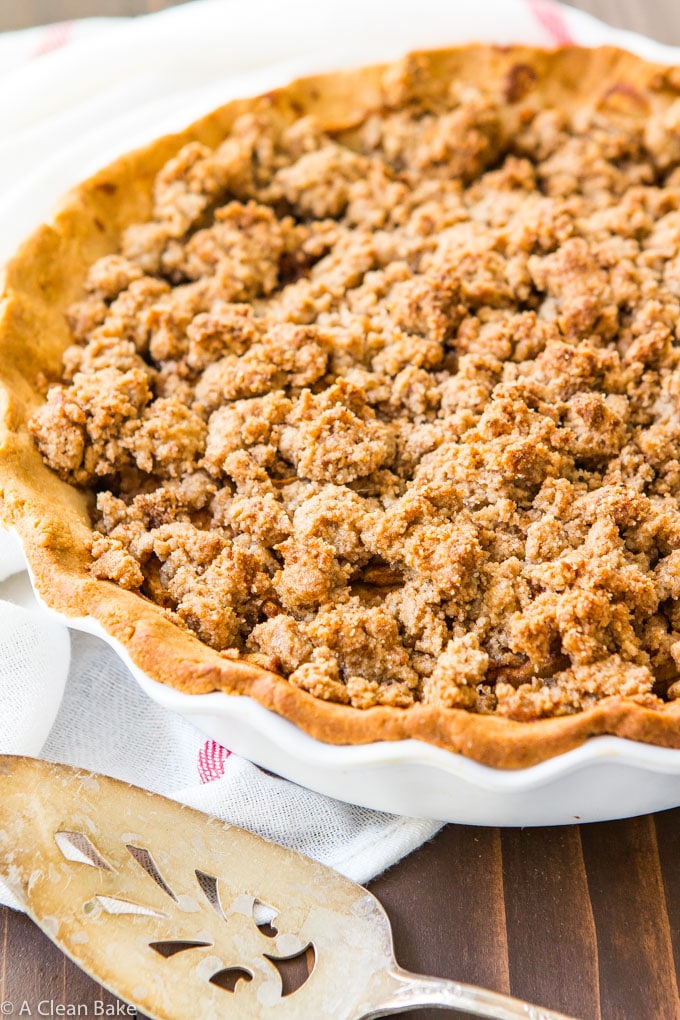
Paleo Apple Pie vs Regular Apple Pie
Maybe this is self-explanatory, but there are a couple of crucial differences between this and a traditional apple pie. While it looks pretty standard on the surface, rest assured it is (as always!) totally gluten free, grain free, refined sugar free, and paleo-friendly.
The crust
The pie starts with my go-to grain free crust recipe. It’s newer to the site, made from a simple combination of almond flour, cassava flour, egg, butter (or shortening), and a pinch of salt. Plus, a few tablespoons of water to pull it all together.
You’ll make the dough in the food processor (let the machines do the work!) and roll it out between two pieces of wax or parchment paper. Then carefully transfer it to the pie plate and pre-bake for 10 minutes.
Why pre-bake?
Two reasons: First, because once the crust is filled with a thick layer of wet apple filling, it is harder for it to cook through. Pre-baking gives it a head start so that the crust is done when the filling is done
Second, because pre-baking provides sort of a shield against the moisture of the filling. Without a little bit of the sturdiness that baking provides, the crust may absorb too much moisture from the filling while it is baking and end up a mushy mess, instead of the layer of pie reinforcement that it should be.
This is a thin crust – just enough to support the apples without interfering – so it needs a little extra reinforcement.
How to pre-bake
Good question. The method is simple: Press the crust into the pan and trim the edges or fancy it up however you want to (crimp it between your thumb and first and second fingers, if you want). Then, cover the crust with a layer of lightly greased parchment paper. Do not use wax paper! The wax will melt into the pie crust. No, thanks.
Add your pie weights in to the cavity of the pie crust (the pie “shell”) , on top of the parchment. What’s that? You haven’t felt the need to invest $10+ on a unitasker? That’s ok. Me neither. Instead, I use dry kidney beans to fill my pie shells while they pre-bake. You casually find a 1-lb bag of them at the grocery store for around $0.99. A 90% savings? Yes please.
You can use any type of beans that you want, but I like kidney beans best because they are so large. But once you’ve used them as pie weights, don’t eat them. Just let them cool completely and put them in a jar in the back of the cabinet for the next pie shell!
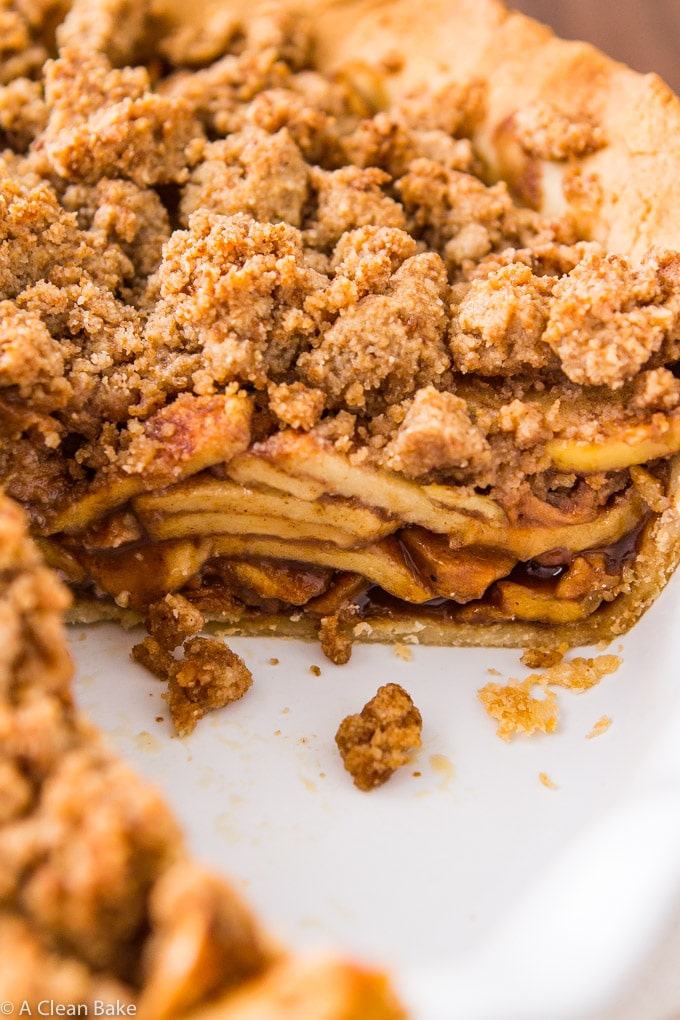
Next, the pie filling
It’s a pretty standard filling that I modeled after the way I used to see my mom make her pies (I don’t know if she ever used a recipe for the filling, actually, but I do!).
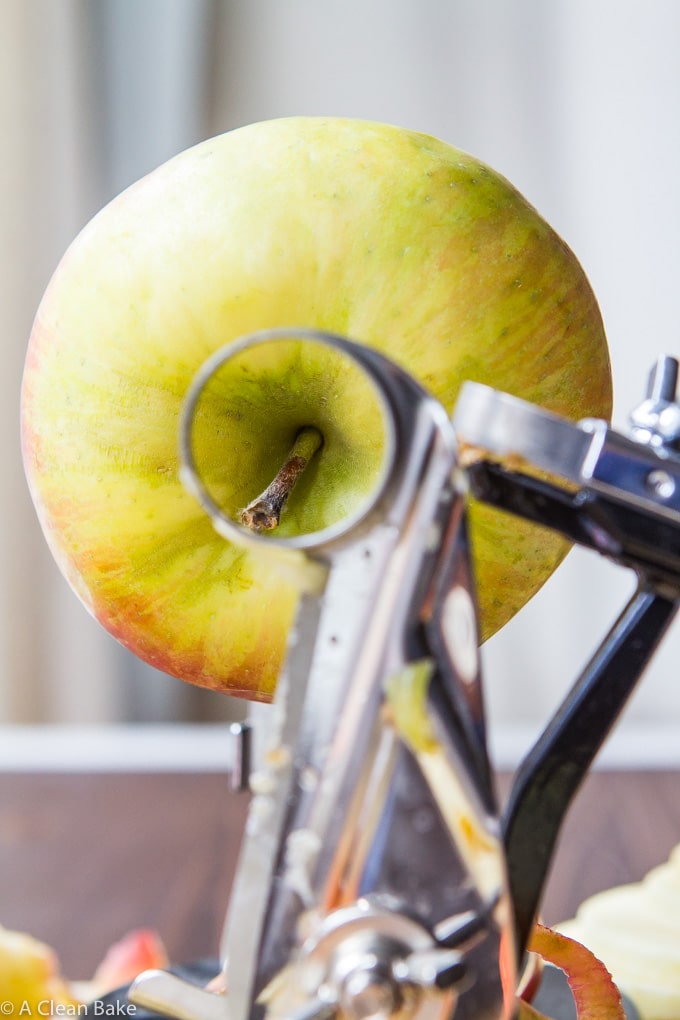
Start with peeled, cored, and sliced apples. I will admit that my hand crank peeler/corer/slicer is one of the very few unitaskers that I allow in my kitchen, but it is so worth it when you want to make apple pie. Otherwise, I guess you get a good arm workout!
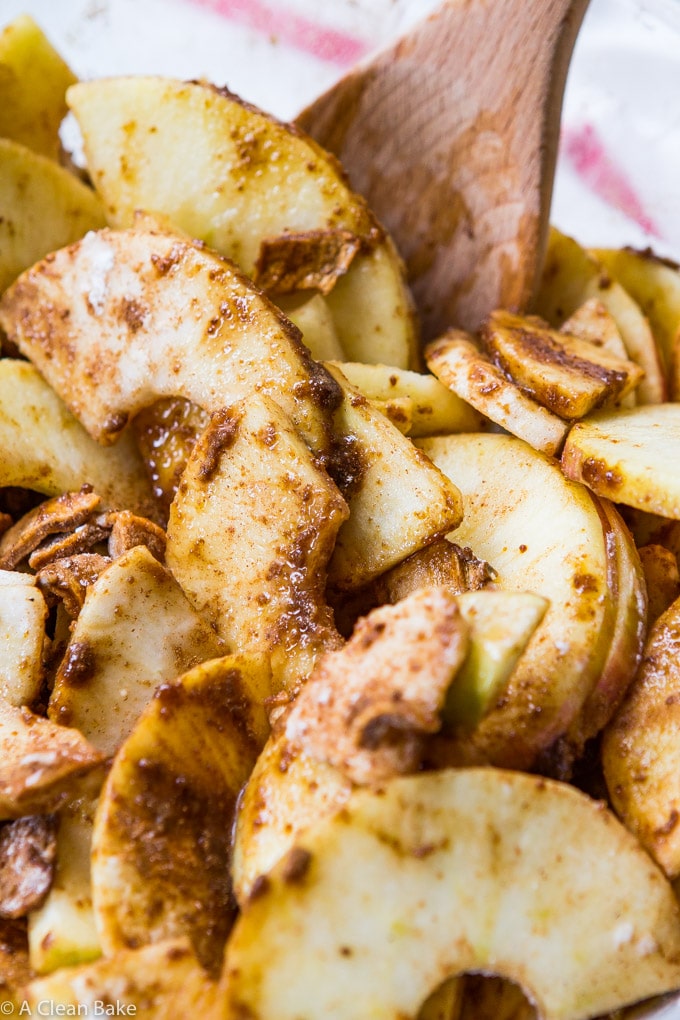
I recommend semi-tart varieties of apples. I used Honeycrisp, Cortlandt, and Granny Smith for this pie and it turned out beautifully – sweet enough without being too one dimensional. If you want more information on how to choose apples for pie, check out my friend Kristen’s in-depth tutorial.
You’ll toss the prepared apples in a large bowl with coconut sugar (another paleo-friendly swap), fresh lemon juice (which brings out the sweetness), tapioca starch (which absorbs excess moisture in the filling), a ton of cinnamon, and… drumroll… a secret ingredient!
My secret ingredient for maximum apple flavor
Here’s a trick for taking the apple-y-ness of your apple pie to the next level: dried apples. Because they are dried, their apple flavor is super concentrated, so they add exponentially more apple-y-ness (how do you spell that word?!) without extra bulk or moisture.
I chop them up pretty finely so that there are no awkward pieces in your bite of pie, and I swear, you don’t even know they’re there. You just taste maximum apple flavor.
You can find unsweetened dried apples online, or at Whole Foods or Trader Joe’s. Target may also have them. Just make sure you are not using freeze dried. (When you find them, make sure to grab an extra bag so you can make apple pie paleola, too!)
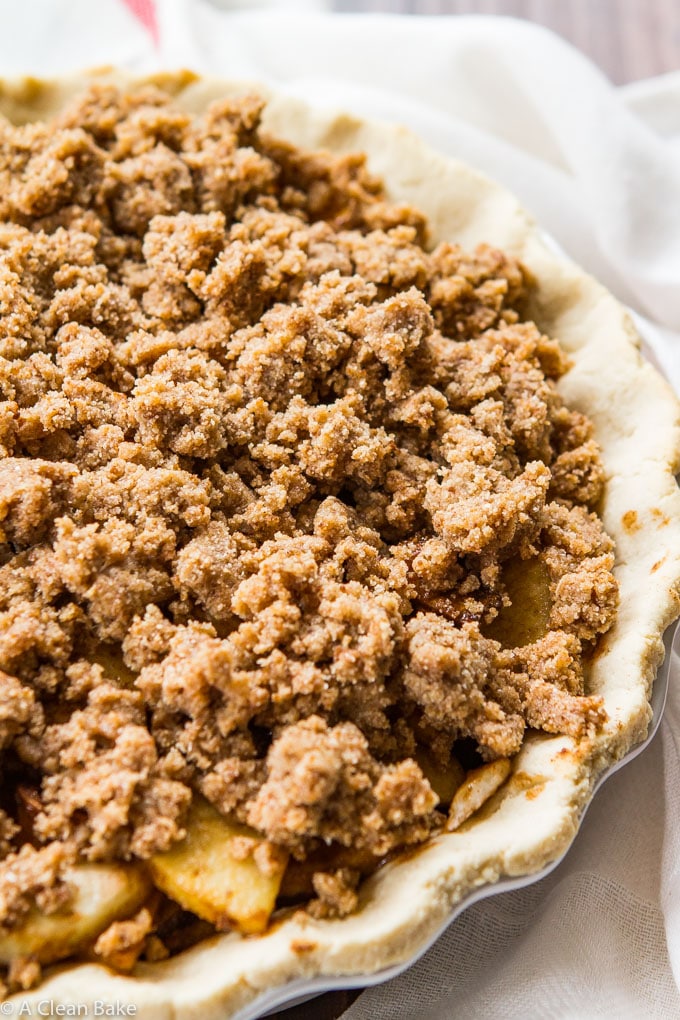
Streusel me, baby
Once you’ve tossed together the quick filling, you’re going to make the crumb topping. It is a simple streusel “mix dry, mix wet, combine” scenario, but once you’re done – wow. It is heaven.
You’ll want to eat it immediately, but resist! Muster all your self control and cover the pie with it. It is worth it, and you may never want to make a dough-lattice topped pie again once you’ve tried this streusel.
OK, that’s everything.
A ton of information, I know, but since there are several components to this pie, I wanted to walk you through it! Thanks for sticking with me through almost 1,000 words about pie.
Now, let’s bake!
For a quick recipe video, click here for our new web story!
Paleo Apple Pie with Crumb Topping
Paleo apple pie is much easier to make than you'd think when you fill a reliable grain free and low carb crust with three kinds of apples, warm cinnamon, and rich coconut sugar, and top it all with a thick layer of luscious crumb topping! Finish it with a dollop of ice cream and a drizzle of caramel sauce. No one will believe it's gluten free, grain free, and dairy free!
Ingredients
Ingredients for the pie
- 1 gluten free crust
- 7 cups apple slices, (about 6-7 semi-tart apples peeled, cored, and sliced)
- 1/2 cup coconut sugar
- 1/3 cup chopped dried apples
- 2 Tablespoons tapioca flour
- 1 Tablespoon cinnamon
- 2 teaspoons fresh lemon juice
- Pinch fine sea salt
Ingredients for the Crumb Topping
- 1 cup blanched almond flour
- 3 Tablespoons coconut sugar
- 1 Tablespoon coconut flour
- 1/2 Tablespoon cinnamon
- 1 pinch fine sea salt
- 1/4 cup coconut oil, melted
- 1/4 cup maple syrup
Ingredients for finishing (optional)
- 1 large egg
- 1 Tablespoon milk of choice or water
- Caramel sauce
- Vanilla or cinnamon ice cream
Instructions
Make the crust
- Prepare the crust according to these instructions, including pre-baking 15 minutes.
- Keep the oven preheated to 350F.
Make the filling
- In a large mixing bowl, toss together all of the ingredients until well combined.
- Pour the filling into the pre-baked and cooled pie shell and use a spatula to spread it into an even layer. Set aside.
Make the crumb topping
- In a medium mixing bowl, whisk together the almond flour, coconut sugar, coconut flour, cinnamon and salt. Set aside.
- In a small bowl, whisk together the oil and maple syrup.
- Pour the wet mixture over the dry mixture and stir to combine.
- Use a spoon or your fingertips to drop dollops of crumble all over the top of the pie, covering all of the apples. Note: the crumble will be wetter than you may expect before it has baked! That's normal.
- Optional step: Whisk an egg with 1 Tablespoon of milk or water to create an egg wash. Brush the edges of the crust. This will produce a golden brown crust, but will also make it crisper. For a more tender edge, skip this step.
- Bake for 30 minutes. Then loosely cover the edges of the crust with tinfoil (or a shield) and bake for another 30 minutes or so, until the top is golden.
- Cool completely (or mostly) before serving.
Nutrition Information:
Yield: 10 Serving Size: 1 SliceAmount Per Serving: Calories: 540Total Fat: 32gSaturated Fat: 15gTrans Fat: 0gUnsaturated Fat: 15gCholesterol: 46mgSodium: 125mgCarbohydrates: 58gFiber: 7gSugar: 41gProtein: 9g
Check out more paleo recipes here!
Aimee says
I might have missed this but what size pie plate did you use?
Nora (A Clean Bake) says
Hi Aimee! I used an 8.5″ deep dish plate. If you use a standard 9″ plate, you should be fine!
Angie says
Have you tried your pie crust with an egg replacer? My daughter can’t have eggs and I’m trying to find a paleo crust she can eat. Thanks so much for this recipe. I can’t wait to try it for Thanksgiving!
Nora (A Clean Bake) says
Hi Angie! I have not tried this with an egg replacer, so I’m not sure how it would turn out. But, I do have a vegan pie crust recipe that you may want to use instead. You can find it here. There is no sweetener in it (feel free to add a couple tablespoons of your granulated sweetener of choice). Be warned that it doesn’t hold together too well so you may have a bit of trouble getting the slices out of the pie plate. But otherwise, it should work!
Brittany says
OMG! This looks so yummy! I can’t wait to try this!
Nora (A Clean Bake) says
Thanks, Brittany!
Cindy says
Super excited to make this healthier Apple pie. Can you make it in advance and freeze it? Thanks!
Nora (A Clean Bake) says
Hi Cindy! Yes, you can make it ahead and freeze it, but the crust won’t be quite as crisp when you defrost it as it would be fresh.
Rebecca says
Hi Angie!
This is just what I wanted to do, it looks amazing! One question, can I make it a day ahead and refrigerate for the next day? Will it be good if I reheat it?
Thanks!
Rebecca
Nora (A Clean Bake) says
You can make it a day ahead but the crust might get a bit soggy. I’d recommend saving the last 15-20 minutes of baking for the day you want to serve it (so par-bake it the day before, cool, cover and store in the fridge. Then bring it to room temp the next day before finishing baking). You’ll probably have to add a few extra minutes to the second day’s bake, so if you’re planning to bake for the last 15 minutes of the recipe, plan for 20-25.
Candice Powers says
Hi Nora, thanks for the great recipe! Correct me if I’m wrong, but was the baking temp left out of the instructions? I couldn’t seem to find it anywhere. Thanks again!
Candice
Nora (A Clean Bake) says
Hi Candice! The baking temp is 350 (see instruction #1).
Katie says
Hi is that one and a half cups of almond flour or one half cup?
Nora (A Clean Bake) says
Hi! It’s one and a half cups.
Katie says
Thank you! I figured it out and this pie was absolutely delicious!
Laureen says
Hi
Could you substitute butter for the coconut oil in the crumb top?
Nora (A Clean Bake) says
Yes!
Holli says
This recipe looks great, I hope mine turns out! I have never used pie weights or beans as. Is this a necessity? Why is this done? My second questions is, Will my pie be ok without dried apples? If I don’t use dried apples do I just use another 1/3 cup of fresh apples? Thank you, I am eager to try this recipe for my family.
Nora (A Clean Bake) says
Hi Holli! The logic behind the pie weights is to keep the crust flat during the blind baking step (pre-bahing the crust before the filling is added). Without something to nudge the crust to stay flat, it could bubble from air trapped under or in the crust- remember air expands as it gets hotter!
Yes, your pie will totally be fine without the dried apples. I would recommend just leaving them out (rather than adding more apples to make up for them). Your apple filling will have a slightly less concentrated apple flavor but you won’t notice!
Jennifer says
I have celiac disease and I am allergic to almonds. Can tigernut or cassava flour be used as a substitute? If so, does the weight/amount change in substituting ?
Thank you!
Nora (A Clean Bake) says
I would not recommend it (they absorb moisture differently) but if you can tolerate other tree nuts, cashew flour should work!
Krista says
I was super impressed by this recipe. I follow an aip/paleo diet and my daughter has celiac. I have been testing recipes for Thanksgiving and was really wanting to do a Dutch apple pie. I am happy to say this was a hit with my family. We will be rolling this out on Thanksgiving Day. Thanks for the recipe!
Nora (A Clean Bake) says
I am THRILLED to hear that!! Thank you so much. Happy Thanksgiving!
Angelina Leyvas says
Hi!
I really want to make this pie for Thanksgiving tomorrow but I’m not understanding where to find the correct ingredient measurements for the ‘Make The Crust’ section. I clicked on the link ‘1 gluten-free crust, pre-baked for 15 minutes’ but it’s not giving me the same ingredients you ask for in the ‘Make The Crust’ instructions.
Please help! I really want to make this!! it looks so good!! & I can’t have wheat because I’m allergic so this the only dessert I’ll be able to have for Thanksgiving.
Thanks!
Nora (A Clean Bake) says
Hi Angelina! Sorry for the confusion. I updated the crust recipe and forgot to update the instructions in this post!
Stacy says
Can you tell me how much of the 41 g of sugar is natural vs. added? Thank you in advance!
Nora (A Clean Bake) says
I’m not sure off the top of my head, I’m sorry. The nutrition info is automatically calculated when I complete the recipe card.
Sue says
What temperature do you bake it at? I couldn’t find it in the recipe.
Nora (A Clean Bake) says
350. Basically, you are supposed to keep your oven on after pre-baking the crust, but the oven temp is in the crust recipe. Sorry if that wasn’t clear! I’ve updated the recipe for clarify. Happy Thanksgiving!
Mariah says
Hi Nora!
In this page you mentioned the crust has coconut flour in it. But when I went to directions specifically about the crust it says cassava flour. Can I use coconut flour instead of Cassava in the recipe?
Thanks!
Nora (A Clean Bake) says
Hi Mariah! Thanks for bringing that to my attention. I updated the crust recipe but forgot to update that portion of the text – oops! I’ve corrected it now. Sorry for the confusion and happy Thanksgiving!
Rachel says
This pie was delicious and I’m making again for our Christmas dessert. Thanks for the pointers on making the crust and pie the day before.
One additional question. When I make the “crumb” topping it is quite wet and not like a traditional dry crumble. Is this how it turns out for you? Baked and tasted fine, but I’m just curious.
Nora (A Clean Bake) says
Thank you SO much!
Yes, the crumb topping is supposed to be very wet before it’s baked. It’s unusual, certainly! But it sounds like you did everything exactly right!
Karen says
Excited to try this…..but I am confused about the crumb topping ingredient….it says 1 T of coconut flour or butter?
Nora (A Clean Bake) says
My mistake! That should say coconut flour, but the butter is an alternative to the coconut oil, listed below.
Heather Nielsen says
Can I use coconut flour or almond flour instead of tapioca flour?
Nora (A Clean Bake) says
No, I’m sorry!
Susan says
What is the “pie weight” all about? And what does one do with it or the pound of kidney beans in a plastic bag? I am cooking lectin- free so beans are off the table (no pun intended. Thank you! Can’t wait to make this pie!!
Nora (A Clean Bake) says
Great question! Pie weights are placed in the “blind” (empty) pie crust while it pre-bakes, that is, before the filling is added, to weigh the crust down. Without them, the bottom crust sometimes bubbles up and bakes sort of warped. Pie weights ensure a nice flat bottom crust before the filling is added. I use dried beans because ceramic pie weights are very expensive. You don’t actually eat the beans, though, don’t worry! Feel free to email me if you’d like further clarification!!
Ella says
Love this is Paleo. Love updating old recipes to new healthier versions.
Nora (A Clean Bake) says
Thank you!
Mary says
Love crumble. Never thought to put it on top of a pie!
Nora (A Clean Bake) says
Isn’t it fun!